November 4, 2012

Activating Publishing Infrastructure Feature

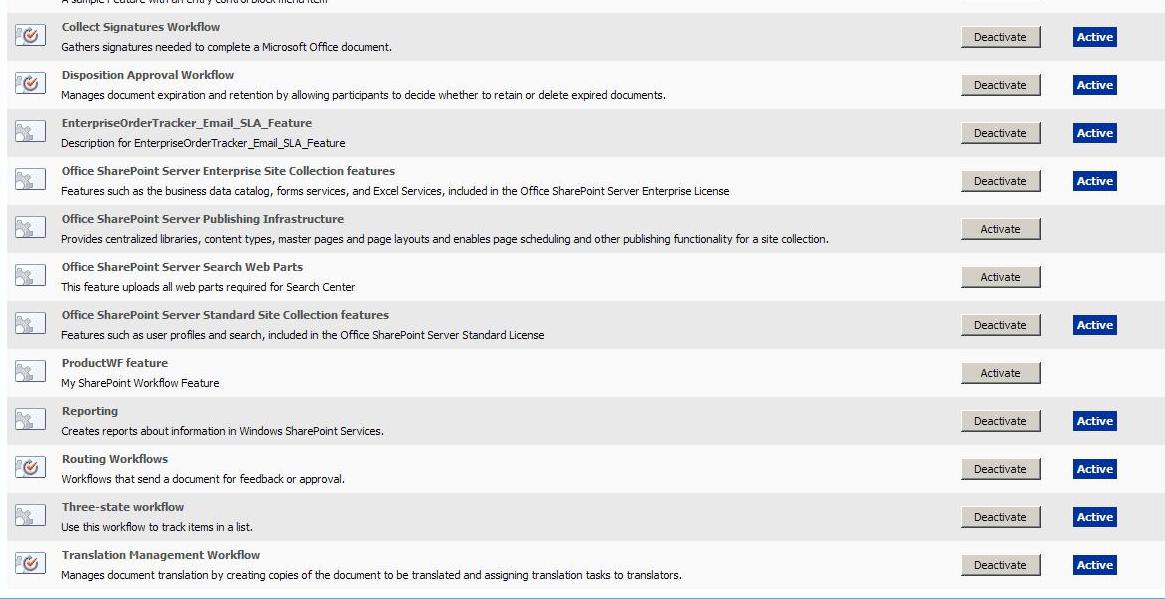
To make a site publishing type, we need to activate "Office SharePoint Server Publishing Infrastructure". Sometimes, activating Office SharePoint Server Publishing Infrastructure feature on a site collection throws error. There are two ways to activate the same feature. 

1) Clicking on Activate button in feature gallery and
2) By using stsadm commands.

To activate  publishing infrastructure feature through commands, use the below commands:

stsadm -o activatefeature -filename publishing\feature.xml -url http://sitecollectionurl -force

stsadm -o activatefeature -filename publishingresources\feature.xml -url
http://sitecollectionurl -force

stsadm -o activatefeature -filename publishingSite\feature.xml -url
http://sitecollectionurl -force

stsadm -o activatefeature -filename publishingweb\feature.xml -url
http://sitecollectionurl -force

stsadm -o activatefeature -filename publishinglayouts\feature.xml -url
http://sitecollectionurl -force

stsadm -o activatefeature -filename navigation\feature.xml -url
http://sitecollectionurl -force


October 15, 2012

Extracting DLL from assembly

Sometimes, based on the requirements , we get into a situation when we want to extract DLL's from assembly. In direct words, it is not possible to drag-drop the DLL's from the assembly folder which is generally located at C:\windows\assembly location.

So, extract the dll from assembly folder, perform these steps

1) Click Start > Run.
2) In Run window, enter "C:\windows\assembly\gac" without quotes and press enter.
3) The window that open, contains dll's in folder, which you can easily copy or drag-drop.


August 12, 2012

Searching Document or Form Library items using JQuery

JQuery plays an important role in the Sharepoint or you can say, web development. It will sound interesting to you that we can use the jquery even for searching items from a document, form or images library. 

I have used the jquery , found on the "Sharepoint Kings Blog" ( thanx for sharing this jquery), with the custom searching scope to search the items from a particular document library.

To implement the jquery for searching, we need to do the following steps:
1) Create custom search scope.
2) Create webpart page.
3) Adding CEWP (content editor webpart) and pasting the jquery in source editor tab.
4) Changing the Scope attribute to the custom new scope (if required).

So, to create the custom scopes,
1) Go to Site Actions > Site Settings
2) Under Site Collection Administration > Search Scopes
3) On next page, click New Scope
4) Click OK.

After creating the custom scope, we need to add rules to the custom scopes. On the view scopes page, click Add Rules, next to the newly created search scope.

1) In Scope Rule Type, Select the Web Address option.
2) In Web Address, Select Folder and enter the url of the library from which you want to search the items( you can create the rules as per your requirement).
3) In Behaviour, Select Require.
4) Click OK.


Now, you are done with creating custom search scope and rules. Its time to add the CEWP. Edit the page where you want to display the search results and add CEWP. In the source editor button, paste the below Jquery and update the following
1)url of the  jquery-1.3.2.min.js file (at the top of the jquery).
2) update the Scope with the name of the new custom search scope under "Customizable parameters ".

<script type="text/javascript" src="/_LAYOUTS/1033/jquery-1.3.2.min.js"></script>
<script type="text/javascript">


// *** Customizable parameters ***

var quickSearchConfig = {
delay: 500, // time to wait before executing the query (in ms)
minCharacters: 3, // minimum nr of characters to enter before search
scope: "CustomSearchScopeName", // search scope to use
numberOfResults: 75, // number of results to show
resultsAnimation: 200, // animation time (in ms) of the search results
resultAnimation: 0 // animation time (in ms) of individual result (when selected)
};
</script>

<style type="text/css">

.quickSearchResultDivUnselected
{
background: white;
border: 1px solid white;
margin-left: 2px;
overflow: hidden;
text-overflow: ellipsis;
}
.quickSearchResultDivSelected
{
background: #EEEEEE;
border: 1px solid Gray;
margin-left: 2px;
overflow: hidden;
text-overflow: ellipsis;
}
</style>
<table id="quickSearchTable" class="ms-sbtable ms-sbtable-ex" border="0" style="width:50%">
<tbody>
<tr class="ms-sbrow">
<td class="ms-sbcell">
<input style="width: 50%" id="quickSearchTextBox" class="ms-sbplain" title="Enter search words"
style="width: 170px" alt="Enter search words" maxlength="200" value="" />
</td>
<td class="ms-sbgo ms-sbcell" style="width: 14px">
<img title="Go Search" style="border-top-width: 0px; border-left-width: 0px; border-bottom-width: 0px;
border-right-width: 0px" alt="Go Search" src="/_layouts/images/gosearch.gif" />
</td>
<td style="width: 1px">
</td>
</tr>
</tbody>
</table>
<div id="quickSearchResults" style="display: none;">
</div>

<script type="text/javascript">

var quickSearchTimer;
var quickSearchSelectedDivIndex = -1;

function showResultsDiv(text) {

var div = $("#quickSearchResults");
var prevTable = div.prev();

var divCss = {

"left": prevTable.offset().left,
"padding": 2,
"position": "absolute",
"top": prevTable.offset().top + prevTable.height() + 1,
"border": "1px solid #7f9db9",
"width": prevTable.width() - 3,
"background": "white",
"max-width": prevTable.width() - 3
};

div.css(divCss).append(text).slideDown(quickSearchConfig.resultsAnimation);

}

$(document).ready(function() {

$('#quickSearchTextBox').keyup(function(event) {
var previousSelected = quickSearchSelectedDivIndex;

// catch some keys

switch(event.keyCode) {
case 13: // enter
var selectedDiv = $("#quickSearchResults>div:eq(" + quickSearchSelectedDivIndex + ") a");
if(selectedDiv.length == 1)
window.location = selectedDiv.attr("href");
break;
case 38: // key up
quickSearchSelectedDivIndex--;
break;
case 40: // key down
quickSearchSelectedDivIndex ++;
break;
}

// check bounds

if(quickSearchSelectedDivIndex != previousSelected) {
if(quickSearchSelectedDivIndex < 0)
quickSearchSelectedDivIndex = 0;
if(quickSearchSelectedDivIndex >= $("#quickSearchResults>div").length -1)
quickSearchSelectedDivIndex = $("#quickSearchResults>div").length - 2;
}

// select new div, unselect the previous selected

if(quickSearchSelectedDivIndex > -1) {
if(quickSearchSelectedDivIndex != previousSelected) {
unSelectDiv( $("#quickSearchResults>div:eq(" + previousSelected + ")"));
selectDiv($("#quickSearchResults>div:eq(" + quickSearchSelectedDivIndex + ")"));
}
}

// if the query is different from the previous one, search again

if($('#quickSearchTextBox').data("query") != $('#quickSearchTextBox').val()) {
if (quickSearchTimer != null) // cancel the delayed event
clearTimeout(quickSearchTimer);
quickSearchTimer = setTimeout(function() { // delay the searching
$("#quickSearchResults").fadeOut(200, initSearch);
} , quickSearchConfig.delay);
}
});
});

function unSelectDiv(div) {

// first stop all animations still in progress
$("#quickSearchResults>div>div").stop(true,true);

div.removeClass("quickSearchResultDivSelected").addClass("quickSearchResultDivUnselected");

$("#details", div).hide();
}

function selectDiv(div) {

div.addClass("quickSearchResultDivSelected");
$("#details", div).slideDown(quickSearchConfig.resultAnimation);
}

function initSearch() {

// first store query in data
$('#quickSearchTextBox').data("query", $('#quickSearchTextBox').val());

// clear the results

$("#quickSearchResults").empty();

// start the search

var query = $("#quickSearchTextBox").val();
if(query.length >= quickSearchConfig.minCharacters) {
showResultsDiv("Searching ..."); // display status
search(query);
}
}

function search(query) {

quickSearchSelectedDivIndex = -1;
var queryXML =
"<QueryPacket xmlns='urn:Microsoft.Search.Query' Revision='1000'> \
<Query domain='QDomain'> \
<SupportedFormats><Format>urn:Microsoft.Search.Response.Document.Document</Format></SupportedFormats> \
<Context> \
<QueryText language='en-US' type='STRING' >SCOPE:\"" + quickSearchConfig.scope + "\"" + query + "</QueryText> \
</Context> \
<SortByProperties><SortByProperty name='Rank' direction='Descending' order='1'/></SortByProperties> \
<Range><StartAt>1</StartAt><Count>" + quickSearchConfig.numberOfResults + "</Count></Range> \
<EnableStemming>false</EnableStemming> \
<TrimDuplicates>true</TrimDuplicates> \
<IgnoreAllNoiseQuery>true</IgnoreAllNoiseQuery> \
<ImplicitAndBehavior>true</ImplicitAndBehavior> \
<IncludeRelevanceResults>true</IncludeRelevanceResults> \
<IncludeSpecialTermResults>true</IncludeSpecialTermResults> \
<IncludeHighConfidenceResults>true</IncludeHighConfidenceResults> \
</Query></QueryPacket>";

var soapEnv =

"<soap:Envelope xmlns:xsi='http://www.w3.org/2001/XMLSchema-instance' xmlns:xsd='http://www.w3.org/2001/XMLSchema' xmlns:soap='http://schemas.xmlsoap.org/soap/envelope/'> \
<soap:Body> \
<Query xmlns='urn:Microsoft.Search'> \
<queryXml>" + escapeHTML(queryXML) + "</queryXml> \
</Query> \
</soap:Body> \
</soap:Envelope>";

$.ajax({

url: "/_vti_bin/search.asmx",
type: "POST",
dataType: "xml",
data: soapEnv,
complete: processResult,
contentType: "text/xml; charset=\"utf-8\""
});

function processResult(xData, status) {

var html = "";
$(xData.responseXML).find("QueryResult").each(function() {
var divWidh = $("#quickSearchTable").width() - 13;

var x = $("<xml>" + $(this).text() + "</xml>");

x.find("Document").each(function() {
var title = $("Title", $(this)).text();
var url = $("Action>LinkUrl", $(this)).text();
var description = $("Description", $(this)).text()

html +=

"<div class='quickSearchResultDivUnselected' style='width:" + divWidh + "px;max-width:" + divWidh +"px'> \
<a href='" + url + "'>" + $("Title", $(this)).text() + "</a> \
<div style='display:none' id='details' style='margin-left:10px'>"
+ description +
"<br/>" + url + " \
</div> \
</div>";
});
if(x.find("TotalAvailable").text() != "")
html += "<div style='text-align:right'>Total results: " + x.find("TotalAvailable").text() + "</div>";
else
html += "<div style='text-align:right'>Total results: 0</div>";
});

$("#quickSearchResults").empty().append(html);

$("#quickSearchResults>div>a").hover(
function() { selectDiv($(this).parent()); },
function() { unSelectDiv($(this).parent()); }
);
showResultsDiv();
}
}

function escapeHTML (str) {

return str.replace(/&/g,'&amp;').replace(/</g,'&lt;').replace(/>/g,'&gt;');
}
</script>


Save the page.


 Now, enter the string into the text box and your search result will display like the below image.


August 8, 2012

Error while removing WSP from MOSS/Sharepoint

I found this article on "Alex Thissen" blog. Thank"Alex" for sharing this topic with us.

Sometimes, while or after installing wsp(solution) into MOSS/Sharepoint, we face error. As a result, we could not even retract or remove the solution from Soution Management in Central Administration. So, follow the below specified steps and remove the malfunctioning wsp from moss.

It could happen that you (or whatever) accidentally break a deployed solution on a Windows SharePoint Services 3.0 (or MOSS 2007 for that matter) farm or site. If that happens, you can no longer retract and/or remove a solution by using the Operations part of the Central Administration website. It will show up as an error in the list of solutions under "Solution Management".
So how do you go about removing the solution entirely? You can use the command-line tool STSADM.exe which can be found under "C:\Program Files\Common Files\Microsoft Shared\web server extensions\12\BIN" for a normal installation of WSS 3.0. Let's assume that the malfunctioning solution is called HelloWorldWebPart.wsp.
To see a list of all solutions that are on the server run the enumsolutions operation. Operations are the commands that STSADM.exe will take after the -o command-line argument. This is the way you run all operations. If you need help on a particular one, call STSADM.exe -help operationname.

Like in the output above, the solution (even if malfunctioning) could be deployed. You will need to retract the solution first. This is where you probably run into trouble. When you run the operation retractsolution like this:

 Two things can happen at this point: you either panic or stay cool (or panic in a cool way). Should panic kick in, you probably will try to still forcibly delete the solution by running the deletesolution operation anyway.

Oh no, what to do now? Calm down. Run an enumeration over the scheduled deployments (retractions are considered deployments as well)

The JobId attribute of the deployment gives the GUID for the job that was scheduled but could not run. You can stop the scheduled retraction by running the operation canceldeployment (again, it's not cancelretraction).
stsadm -o canceldeployment -id 2529c788-971c-46a3-b69f-a2a0a1fcc851
At this point the scheduled retraction should be gone, which you can verify by using enumdeployments again.
Now you can read the message of the retractsolution operation again. You would have done so anyway if you just remained calm. The message says that the WSS Administration service hasn't been started yet. Not that strange, since by default it is configured to start manually.

Start the service and run the execadmsvcjobs operation to run all scheduled jobs.


  There you go, no more deployed solution. Now it is just a matter of removing the solution. You can try using the Central Administation website again, because usually the error on the solution has disappeared. 

Otherwise, run the deletesolution operation in STSADM.


July 24, 2012

Blank IIS Manager ( No website )

Sometimes, in Moss 2007, we try to open a site but it doesn’t. Then we try to reset the IIS and got the following error.

Then, try to open the IIS Manager, and we are surprised to see it blank.

After, having a headache, we trying to run the IIS admin service, we again get the following error.

To find the cause for the error , we open the event viewer and get the following error description.


So, the main reason for this blank IIS manager and errors are the problem in the MetaBase.xml file, which can be found at C:\WINDOWS\system32\inetsrv location.


Look for the Date Modified and Size attributes of both the above files. There is a backup (or History) of these files in the History folder which can be found at the location C:\WINDOWS\system32\inetsrv\History. The folder contains backup of both MBSchema.xml and MetaBase.xml files. Now, we have to replace the either of the files MBSchema.xml or MetaBase.xml at C:\WINDOWS\system32\inetsrv, with the latest History found at C:\WINDOWS\system32\inetsrv\History location. 
 Suppose, if the Date Modified attribute of the MetaBase.xml file has the latest date, and then replace this file with the MetaBase.xml file found at location C:\WINDOWS\system32\inetsrv\History.(remove the appended _0000121786_0000000000 like strings). Now, reset the IIS and your IIS manager will get populated.

Drag Drop of webparts functionality is not working in Moss 2007

In Moss 2007, most of the times we want to move the added webparts from one webpart zone to another webpart zone by drag and drop. But sometimes, this functionality is missing in moss 2007 customised pages. The solution of this problem is to add the script to the master page of the site.

Refer to the below image :


Add the script between the <WePartPages:SPWebPartManager> and <form> tag.

        <script language="javascript" type="text/javascript">
            function MSOLayout_GetRealOffset(StartingObject, OffsetType, EndParent)
            {
                var realValue=0;
                if (!EndParent) EndParent=document.body;
                for (var currentObject=StartingObject; currentObject && currentObject !=EndParent && currentObject != document.body; currentObject=currentObject.offsetParent)
                {
                    var offset = eval('currentObject.offset'+OffsetType);
                    if (offset) realValue+=offset;
                }
                return realValue;
            }
        </script>


July 8, 2012

Apply Custom CSS in MOSS 2007 through aspx pages

In Moss 2007, sometimes we want to apply CSS through the aspx pages. Instead of including the complete css file, to write only few css we can use the PlaceHolderAdditionalPageHead content placeholder to include the custom css.

For example, the below code can be used.

<asp:Content id="Content11" runat="server" contentplaceholderid="PlaceHolderAdditionalPageHead">
    <link rel="stylesheet" type="text/css" href="/_LAYOUTS/1033/STYLES/CustomCSSFileName.CSS">
</asp:Content>

May 9, 2012

Creating Site Content Types in Moss 2007

Following are the steps to create content types in moss 2007.

• From any team site, on the Site Actions menu, click Site Settings.
                                                 OR
• From any portal area, click Site Actions, point to Site Settings, and then click Modify All Site Settings.
• On the Site Settings page, under Site Collection Administration, click Go to top level site settings.
• Under Galleries, click Site content types.
• On the Site Content Type Gallery page, on the menu bar, click Create.


• In the Name box, type the name for this content type. This name will appear in the Content Types list when we will create the page layout.
• In the Description box, type a description for this content type
• In the Select parent content type from list, click Publishing Content Types.
• In the Parent Content Type list, click Page.
• Under Put this site content type into, click Existing group, and then click Page Layout Content Types in the list.


Start workflow to approve content on Publishing sites in Moss 2007

a.    Click on View All Site Content , then click on Pages Document Library
b.    Select Settings on Pages document Library then Document Library Settings
c.    Under Permission and Management click Workflow Settings and do the following changes.

  • Select Approval from workflow
  • Enter Workflow Name as HRPagesApproval
  • Check Start this workflow when a new item is created and start this workflow when an item is changed and click next.
  • Enter the Name of the person who will approve the newly created pages
  • Under complete this workflow, select Document is Rejected.


Enable the Content Approval in Publishing sites in Moss 2007

To Enable the Content Approval for the new pages in Pages Document library in Sharepoint publishing sites.
 

a. Click on View All Site Content , then click on Pages Document Library
b. Select Settings on Pages document Library then Document Library Settings
c. Under General Setting click Versioning Settings and do the following changes.


Creating Sharepoint Groups in Moss 2007

Group can be created at the site collection level. The following example will create group with Read only permission.

1)  On the Site Actions menu, point to Site Settings.
2)  On the Site Settings page, under Users and Permissions, click People and groups.
3)  On the People and Groups page, Click New > New Group.
4)  On Next page, Enter Group Name, Group Owner Name and select Read from the Permission Level.


Creating Custom Permission Level in Moss 2007

Custom permission Level can be created at the site collection level with default rights/options or by creating own rules. The following example shows creating custom permission level using default Contributor permission level.

•    Go to Site Actions > Site Settings > Modify All site Settings > Advanced Permission under User and Permission heading.
•    On the next page , click settings > Permission Levels.
•    On permission Levels page, click Contribute.
•    On bottom of page, click copy permission level. On the copy permission level “Contribute”, enter name of custom permission level and description.
•    Clicks create.


Publishing Feature

To enable the SharePoint Server Publishing Infrastructure feature for a site collection
a. On the Site Actions menu, point to Site Settings, and then click Modify All Site Settings.
b. If you are not at the root of your site, under Site Collection Administration, click Go to top level site settings.
c. On the Site Settings page, under Site Collection Administration, click Site collection features.
d. On the Site Collection Features page, next to Office SharePoint Server Publishing Infrastructure, click Activate.


To enable the SharePoint Server Publishing feature for a site
a)    On the Site Actions menu, point to Site Settings, and then click Modify All Site Settings.
b)    On the Site Settings page, in the Site Administration section, click Site features.
c)    Next to Office SharePoint Server Publishing, click Activate.


Cannot connect to the configuration database Error in MOSS 2007

Sometimes in sharepoint, while opening the sites we got the "Cannot connect to configuration database" error. The below screen appears,


The problem occurs because the Sharepoint_config database is put to the SUSPECT mode in Sql Server. The following can be checked by logging to the SQL Server 2005 Management Studio. Expand Server > Databases > SharePoint_Config. A red mark next to the SharePoint_Config database appears with "Suspect" word.

To solve this problem, we have to follow this approach.

"Suspected" status > "Emergency" status> Multi User Mode > Enable database
(Convert the database to single user mode by going to properties of database >> options >> Restrict Access >> Single Use)


1) The solution to the above problem is to first convert the "SharePoint_Config" database to the "Emergency" mode by using the Following command/query.

alter database "Database_Name" set emergency

2) Convert database to Multi User Mode by using query


ALTER DATABASE Database_Name SET MULTI_USER


(Below command will convert database to Single User Mode)
ALTER DATABASE Database_Name SET single_USER


3) Finally Run below query

EXEC sp_resetstatus '
Database_Name'
GO
ALTER DATABASE
Database_Name SET EMERGENCY
DBCC checkdb('
Database_Name')
ALTER DATABASE
Database_Name SET SINGLE_USER WITH ROLLBACK IMMEDIATE
DBCC CheckDB ('
Database_Name', REPAIR_ALLOW_DATA_LOSS)
ALTER DATABASE
Database_Name SET MULTI_USER


For some seetings to take place (or if you face some errors) try restarting the highlighted sql services.


April 25, 2012

Change Text or Image of the MySite Link in Moss 2007

Sometimes the user wants to change the MySite Link text to something else like "My World". In that case, you can do that by making changes to the MySiteLink.ascx file. This MySiteLink.ascx file is located at
C:\Program Files\Common Files\Microsoft Shared\web server extensions\12\TEMPLATE\CONTROLTEMPLATES
Now, open that MySiteLink.ascx file in sharepoint designer and change the following line
Add visible="false"
The above line will become .

Now, finally to change the Mysite text add the following line with the text that you want to display. Here, i want to display "Hello".

To display image in place of MySite Text you can use the following line

Retriving URL Value of SharePoint Hyperlink Field


To get the value of a SharePoint hyperlink field in a custom list using the object model, we generally use.

SPList mylist = myweb.Lists[Your_ListName];
SPQuery rootQuery = new SPQuery();
rootQuery.Query = "";

SPListItemCollection lstitemcol = mylist.GetItems(rootQuery);

foreach (SPListItem lstitem in lstitemcol)
{
   string URL=lstitem[url_Column_Name].ToString();   
}

The above URL string will contains the value but the only problem with this URl string is that  it will contains two URL’s separated by a comma. This is because one is the actual display text for the field and the other is the value (the actual URL itself).

In order to get just the URL value, you need to use the following object model code:

SPFieldUrlValue rootUrl = new SPFieldUrlValue(lstitem[Column_Name].ToString());
string URL = rootUrl.Url;

You can also use value.Description to get the actual display text for the field.

Error installing .Net Framework 3.5 in Sql Server 2012

During installation of Sql Server 2012 on Windows server 2012 or addition of roles and features for SharePoint 2013, the setup wizard will...