Showing posts with label moss 2007. Show all posts

May 26, 2013

Code blocks are not allowed in this file.

In Moss 2007 or SharePoint 2010, most of the times we need to create the custom master pages. In order to perform certain actions/functions, we need to insert code within those master pages.

Main problem comes into arena, when we try to use upload that master page into the master page gallery or copying into the file system, and use as system master page or site master page. Since the custom master page contains code with in it, so we used to get the below screen.
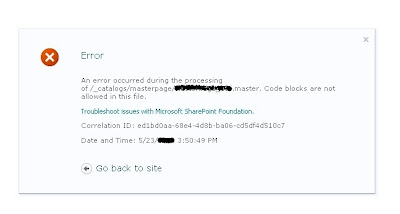
In order to solve this problem, we need to make entries into the corresponding web.config file by following the below steps.

1) Go to corresponding web.config file location which is located at the below location ( under c drive)


2) Open the web.config file , and under the <SafeMode><PageParserPaths> tag make the below entries.

< PageParserPath VirtualPath="/_catalogs/masterpage/*" CompilationMode="Always" AllowServerSideScript="true" IncludeSubFolders="true"/>


VirtualPath attribute should contains location where the master page is located. "/*" at the end of the /_catalogs/masterpage" in the virtual path attribute indicates to also include the subfolders.

May 19, 2013

This page allows a limit of 200 controls, and that limit has been exceeded.

In Moss/Sharepoint, some while playing with placeholders in the master pages we face the error like the below screen.


The above screen shows that the number of placeholders that can be included in a master page has been exceeded.

Solution

The solution for the above problem is that either
1) To remove placeholders from the master page or
2) (Best One) Increase the value of the MaxControls attribute in the web.config of the corresponding web application as highlighted below.


April 17, 2013

Align inner div at center of outer div

While development you must have noticed that <div> tags are used more frequently in all programming languages. So, it is easier to align one <table><tr><td> at center of anothet <table><tr><td>.

But to align, one div at center of another div, we can use style's margin attribute like below.

<Div style="width:100%">
       <Div style="width:50%;margin:0 auto">
            Inner div at center of outer div
       </Div>
</Div>

November 4, 2012

Activating Publishing Infrastructure Feature

To make a site publishing type, we need to activate "Office SharePoint Server Publishing Infrastructure". Sometimes, activating Office SharePoint Server Publishing Infrastructure feature on a site collection throws error. There are two ways to activate the same feature. 

1) Clicking on Activate button in feature gallery and
2) By using stsadm commands.

To activate  publishing infrastructure feature through commands, use the below commands:

stsadm -o activatefeature -filename publishing\feature.xml -url http://sitecollectionurl -force

stsadm -o activatefeature -filename publishingresources\feature.xml -url
http://sitecollectionurl -force

stsadm -o activatefeature -filename publishingSite\feature.xml -url
http://sitecollectionurl -force

stsadm -o activatefeature -filename publishingweb\feature.xml -url
http://sitecollectionurl -force

stsadm -o activatefeature -filename publishinglayouts\feature.xml -url
http://sitecollectionurl -force

stsadm -o activatefeature -filename navigation\feature.xml -url
http://sitecollectionurl -force


October 15, 2012

Extracting DLL from assembly

Sometimes, based on the requirements , we get into a situation when we want to extract DLL's from assembly. In direct words, it is not possible to drag-drop the DLL's from the assembly folder which is generally located at C:\windows\assembly location.

So, extract the dll from assembly folder, perform these steps

1) Click Start > Run.
2) In Run window, enter "C:\windows\assembly\gac" without quotes and press enter.
3) The window that open, contains dll's in folder, which you can easily copy or drag-drop.


August 12, 2012

Searching Document or Form Library items using JQuery

JQuery plays an important role in the Sharepoint or you can say, web development. It will sound interesting to you that we can use the jquery even for searching items from a document, form or images library. 

I have used the jquery , found on the "Sharepoint Kings Blog" ( thanx for sharing this jquery), with the custom searching scope to search the items from a particular document library.

To implement the jquery for searching, we need to do the following steps:
1) Create custom search scope.
2) Create webpart page.
3) Adding CEWP (content editor webpart) and pasting the jquery in source editor tab.
4) Changing the Scope attribute to the custom new scope (if required).

So, to create the custom scopes,
1) Go to Site Actions > Site Settings
2) Under Site Collection Administration > Search Scopes
3) On next page, click New Scope
4) Click OK.

After creating the custom scope, we need to add rules to the custom scopes. On the view scopes page, click Add Rules, next to the newly created search scope.

1) In Scope Rule Type, Select the Web Address option.
2) In Web Address, Select Folder and enter the url of the library from which you want to search the items( you can create the rules as per your requirement).
3) In Behaviour, Select Require.
4) Click OK.


Now, you are done with creating custom search scope and rules. Its time to add the CEWP. Edit the page where you want to display the search results and add CEWP. In the source editor button, paste the below Jquery and update the following
1)url of the  jquery-1.3.2.min.js file (at the top of the jquery).
2) update the Scope with the name of the new custom search scope under "Customizable parameters ".

<script type="text/javascript" src="/_LAYOUTS/1033/jquery-1.3.2.min.js"></script>
<script type="text/javascript">


// *** Customizable parameters ***

var quickSearchConfig = {
delay: 500, // time to wait before executing the query (in ms)
minCharacters: 3, // minimum nr of characters to enter before search
scope: "CustomSearchScopeName", // search scope to use
numberOfResults: 75, // number of results to show
resultsAnimation: 200, // animation time (in ms) of the search results
resultAnimation: 0 // animation time (in ms) of individual result (when selected)
};
</script>

<style type="text/css">

.quickSearchResultDivUnselected
{
background: white;
border: 1px solid white;
margin-left: 2px;
overflow: hidden;
text-overflow: ellipsis;
}
.quickSearchResultDivSelected
{
background: #EEEEEE;
border: 1px solid Gray;
margin-left: 2px;
overflow: hidden;
text-overflow: ellipsis;
}
</style>
<table id="quickSearchTable" class="ms-sbtable ms-sbtable-ex" border="0" style="width:50%">
<tbody>
<tr class="ms-sbrow">
<td class="ms-sbcell">
<input style="width: 50%" id="quickSearchTextBox" class="ms-sbplain" title="Enter search words"
style="width: 170px" alt="Enter search words" maxlength="200" value="" />
</td>
<td class="ms-sbgo ms-sbcell" style="width: 14px">
<img title="Go Search" style="border-top-width: 0px; border-left-width: 0px; border-bottom-width: 0px;
border-right-width: 0px" alt="Go Search" src="/_layouts/images/gosearch.gif" />
</td>
<td style="width: 1px">
</td>
</tr>
</tbody>
</table>
<div id="quickSearchResults" style="display: none;">
</div>

<script type="text/javascript">

var quickSearchTimer;
var quickSearchSelectedDivIndex = -1;

function showResultsDiv(text) {

var div = $("#quickSearchResults");
var prevTable = div.prev();

var divCss = {

"left": prevTable.offset().left,
"padding": 2,
"position": "absolute",
"top": prevTable.offset().top + prevTable.height() + 1,
"border": "1px solid #7f9db9",
"width": prevTable.width() - 3,
"background": "white",
"max-width": prevTable.width() - 3
};

div.css(divCss).append(text).slideDown(quickSearchConfig.resultsAnimation);

}

$(document).ready(function() {

$('#quickSearchTextBox').keyup(function(event) {
var previousSelected = quickSearchSelectedDivIndex;

// catch some keys

switch(event.keyCode) {
case 13: // enter
var selectedDiv = $("#quickSearchResults>div:eq(" + quickSearchSelectedDivIndex + ") a");
if(selectedDiv.length == 1)
window.location = selectedDiv.attr("href");
break;
case 38: // key up
quickSearchSelectedDivIndex--;
break;
case 40: // key down
quickSearchSelectedDivIndex ++;
break;
}

// check bounds

if(quickSearchSelectedDivIndex != previousSelected) {
if(quickSearchSelectedDivIndex < 0)
quickSearchSelectedDivIndex = 0;
if(quickSearchSelectedDivIndex >= $("#quickSearchResults>div").length -1)
quickSearchSelectedDivIndex = $("#quickSearchResults>div").length - 2;
}

// select new div, unselect the previous selected

if(quickSearchSelectedDivIndex > -1) {
if(quickSearchSelectedDivIndex != previousSelected) {
unSelectDiv( $("#quickSearchResults>div:eq(" + previousSelected + ")"));
selectDiv($("#quickSearchResults>div:eq(" + quickSearchSelectedDivIndex + ")"));
}
}

// if the query is different from the previous one, search again

if($('#quickSearchTextBox').data("query") != $('#quickSearchTextBox').val()) {
if (quickSearchTimer != null) // cancel the delayed event
clearTimeout(quickSearchTimer);
quickSearchTimer = setTimeout(function() { // delay the searching
$("#quickSearchResults").fadeOut(200, initSearch);
} , quickSearchConfig.delay);
}
});
});

function unSelectDiv(div) {

// first stop all animations still in progress
$("#quickSearchResults>div>div").stop(true,true);

div.removeClass("quickSearchResultDivSelected").addClass("quickSearchResultDivUnselected");

$("#details", div).hide();
}

function selectDiv(div) {

div.addClass("quickSearchResultDivSelected");
$("#details", div).slideDown(quickSearchConfig.resultAnimation);
}

function initSearch() {

// first store query in data
$('#quickSearchTextBox').data("query", $('#quickSearchTextBox').val());

// clear the results

$("#quickSearchResults").empty();

// start the search

var query = $("#quickSearchTextBox").val();
if(query.length >= quickSearchConfig.minCharacters) {
showResultsDiv("Searching ..."); // display status
search(query);
}
}

function search(query) {

quickSearchSelectedDivIndex = -1;
var queryXML =
"<QueryPacket xmlns='urn:Microsoft.Search.Query' Revision='1000'> \
<Query domain='QDomain'> \
<SupportedFormats><Format>urn:Microsoft.Search.Response.Document.Document</Format></SupportedFormats> \
<Context> \
<QueryText language='en-US' type='STRING' >SCOPE:\"" + quickSearchConfig.scope + "\"" + query + "</QueryText> \
</Context> \
<SortByProperties><SortByProperty name='Rank' direction='Descending' order='1'/></SortByProperties> \
<Range><StartAt>1</StartAt><Count>" + quickSearchConfig.numberOfResults + "</Count></Range> \
<EnableStemming>false</EnableStemming> \
<TrimDuplicates>true</TrimDuplicates> \
<IgnoreAllNoiseQuery>true</IgnoreAllNoiseQuery> \
<ImplicitAndBehavior>true</ImplicitAndBehavior> \
<IncludeRelevanceResults>true</IncludeRelevanceResults> \
<IncludeSpecialTermResults>true</IncludeSpecialTermResults> \
<IncludeHighConfidenceResults>true</IncludeHighConfidenceResults> \
</Query></QueryPacket>";

var soapEnv =

"<soap:Envelope xmlns:xsi='http://www.w3.org/2001/XMLSchema-instance' xmlns:xsd='http://www.w3.org/2001/XMLSchema' xmlns:soap='http://schemas.xmlsoap.org/soap/envelope/'> \
<soap:Body> \
<Query xmlns='urn:Microsoft.Search'> \
<queryXml>" + escapeHTML(queryXML) + "</queryXml> \
</Query> \
</soap:Body> \
</soap:Envelope>";

$.ajax({

url: "/_vti_bin/search.asmx",
type: "POST",
dataType: "xml",
data: soapEnv,
complete: processResult,
contentType: "text/xml; charset=\"utf-8\""
});

function processResult(xData, status) {

var html = "";
$(xData.responseXML).find("QueryResult").each(function() {
var divWidh = $("#quickSearchTable").width() - 13;

var x = $("<xml>" + $(this).text() + "</xml>");

x.find("Document").each(function() {
var title = $("Title", $(this)).text();
var url = $("Action>LinkUrl", $(this)).text();
var description = $("Description", $(this)).text()

html +=

"<div class='quickSearchResultDivUnselected' style='width:" + divWidh + "px;max-width:" + divWidh +"px'> \
<a href='" + url + "'>" + $("Title", $(this)).text() + "</a> \
<div style='display:none' id='details' style='margin-left:10px'>"
+ description +
"<br/>" + url + " \
</div> \
</div>";
});
if(x.find("TotalAvailable").text() != "")
html += "<div style='text-align:right'>Total results: " + x.find("TotalAvailable").text() + "</div>";
else
html += "<div style='text-align:right'>Total results: 0</div>";
});

$("#quickSearchResults").empty().append(html);

$("#quickSearchResults>div>a").hover(
function() { selectDiv($(this).parent()); },
function() { unSelectDiv($(this).parent()); }
);
showResultsDiv();
}
}

function escapeHTML (str) {

return str.replace(/&/g,'&amp;').replace(/</g,'&lt;').replace(/>/g,'&gt;');
}
</script>


Save the page.


 Now, enter the string into the text box and your search result will display like the below image.


May 9, 2012

Creating Site Content Types in Moss 2007

Following are the steps to create content types in moss 2007.

• From any team site, on the Site Actions menu, click Site Settings.
                                                 OR
• From any portal area, click Site Actions, point to Site Settings, and then click Modify All Site Settings.
• On the Site Settings page, under Site Collection Administration, click Go to top level site settings.
• Under Galleries, click Site content types.
• On the Site Content Type Gallery page, on the menu bar, click Create.


• In the Name box, type the name for this content type. This name will appear in the Content Types list when we will create the page layout.
• In the Description box, type a description for this content type
• In the Select parent content type from list, click Publishing Content Types.
• In the Parent Content Type list, click Page.
• Under Put this site content type into, click Existing group, and then click Page Layout Content Types in the list.


Start workflow to approve content on Publishing sites in Moss 2007

a.    Click on View All Site Content , then click on Pages Document Library
b.    Select Settings on Pages document Library then Document Library Settings
c.    Under Permission and Management click Workflow Settings and do the following changes.

  • Select Approval from workflow
  • Enter Workflow Name as HRPagesApproval
  • Check Start this workflow when a new item is created and start this workflow when an item is changed and click next.
  • Enter the Name of the person who will approve the newly created pages
  • Under complete this workflow, select Document is Rejected.


Enable the Content Approval in Publishing sites in Moss 2007

To Enable the Content Approval for the new pages in Pages Document library in Sharepoint publishing sites.
 

a. Click on View All Site Content , then click on Pages Document Library
b. Select Settings on Pages document Library then Document Library Settings
c. Under General Setting click Versioning Settings and do the following changes.


Creating Sharepoint Groups in Moss 2007

Group can be created at the site collection level. The following example will create group with Read only permission.

1)  On the Site Actions menu, point to Site Settings.
2)  On the Site Settings page, under Users and Permissions, click People and groups.
3)  On the People and Groups page, Click New > New Group.
4)  On Next page, Enter Group Name, Group Owner Name and select Read from the Permission Level.


Creating Custom Permission Level in Moss 2007

Custom permission Level can be created at the site collection level with default rights/options or by creating own rules. The following example shows creating custom permission level using default Contributor permission level.

•    Go to Site Actions > Site Settings > Modify All site Settings > Advanced Permission under User and Permission heading.
•    On the next page , click settings > Permission Levels.
•    On permission Levels page, click Contribute.
•    On bottom of page, click copy permission level. On the copy permission level “Contribute”, enter name of custom permission level and description.
•    Clicks create.


Publishing Feature

To enable the SharePoint Server Publishing Infrastructure feature for a site collection
a. On the Site Actions menu, point to Site Settings, and then click Modify All Site Settings.
b. If you are not at the root of your site, under Site Collection Administration, click Go to top level site settings.
c. On the Site Settings page, under Site Collection Administration, click Site collection features.
d. On the Site Collection Features page, next to Office SharePoint Server Publishing Infrastructure, click Activate.


To enable the SharePoint Server Publishing feature for a site
a)    On the Site Actions menu, point to Site Settings, and then click Modify All Site Settings.
b)    On the Site Settings page, in the Site Administration section, click Site features.
c)    Next to Office SharePoint Server Publishing, click Activate.


April 25, 2012

Change Text or Image of the MySite Link in Moss 2007

Sometimes the user wants to change the MySite Link text to something else like "My World". In that case, you can do that by making changes to the MySiteLink.ascx file. This MySiteLink.ascx file is located at
C:\Program Files\Common Files\Microsoft Shared\web server extensions\12\TEMPLATE\CONTROLTEMPLATES
Now, open that MySiteLink.ascx file in sharepoint designer and change the following line
Add visible="false"
The above line will become .

Now, finally to change the Mysite text add the following line with the text that you want to display. Here, i want to display "Hello".

To display image in place of MySite Text you can use the following line

Retriving URL Value of SharePoint Hyperlink Field


To get the value of a SharePoint hyperlink field in a custom list using the object model, we generally use.

SPList mylist = myweb.Lists[Your_ListName];
SPQuery rootQuery = new SPQuery();
rootQuery.Query = "";

SPListItemCollection lstitemcol = mylist.GetItems(rootQuery);

foreach (SPListItem lstitem in lstitemcol)
{
   string URL=lstitem[url_Column_Name].ToString();   
}

The above URL string will contains the value but the only problem with this URl string is that  it will contains two URL’s separated by a comma. This is because one is the actual display text for the field and the other is the value (the actual URL itself).

In order to get just the URL value, you need to use the following object model code:

SPFieldUrlValue rootUrl = new SPFieldUrlValue(lstitem[Column_Name].ToString());
string URL = rootUrl.Url;

You can also use value.Description to get the actual display text for the field.

November 21, 2011

The application attempted to perform an operation not allowed by the security policy. To grant this application the required permission please contac

Sometimes, while executing an application in sharepoint environment, we get the following error.

The application attempted to perform an operation not allowed by the security policy. To grant this application the required permission please contact your system administrator or change the application's trust level in the configuration file. in sharepoint


This problem is basically related with the Trust Level. Just make the following changes in under element of the web.config file of the corresponding web application.


Change from,
< system.web >
< trust level="WSS_Minimal" originUrl="" / >

to in web.config

< system.web >

< trust level="Full" originUrl="" / >

Change Text or Image of the MySite Link in Moss 2007

Sometimes the user wants to change the MySite Link text to something else like "My World". In that case, you can do that by making changes to the MySiteLink.ascx file. This MySiteLink.ascx file is located at


C:\Program Files\Common Files\Microsoft Shared\web server extensions\12\TEMPLATE\CONTROLTEMPLATES
Now, open that MySiteLink.ascx file in sharepoint designer and change the following line

< asp:HyperLink id="hlMySite" runat="server" / >

Add visible="false"

The above line will become < asp:HyperLink id="hlMySite" runat="server" visible="false" / >.

Now, finally to change the Mysite text add the following line with the text that you want to display. Here, i want to display "My World"

< asp:HyperLink ID="NewMySiteHyperlink" runat="server" Text="My World" Visible="true" NavigateUrl="http://your mysite Url/_layouts/MySite.aspx"/ >

To display image in place of MySite Text you can use the following line

< asp:HyperLink ID="NewMySiteHyperlink" runat="server" ImageUrl="/_LAYOUTS/ Link to your image file" Text="My World" Visible="true" NavigateUrl="http:// Your MySite Url/_layouts/MySite.aspx"/ >

October 11, 2011

Configuration Error : Web.Config [No Relevant Source Line]

Sometimes , we get the below error while running pages in Moss 2007


Solution : We have to grant the Full Control on the Security tab and for that right click the folder and select Properties.

Or

You have to place your project in the root drive of windows installation.


September 1, 2011

Browsers error in Sharepoint

Sometimes after making changes in Sharepoint website, we started to get the Browsers error in IE. Like the following error:


The solution to remove this error is to delete the App_Browsers folder in _vti_cnf of respective website in Inetpub.

August 21, 2011

In Sharepoint, if you want to hide the quicklaunch bar, then put the page in Edit mode and add a content editor webpart. Click " modify this webpart" from drop down of webpart and select the Source editor and paste the following lines

This code will hide the quick launch from the page . (Make the Content Editor webpart hidden.)

Error installing .Net Framework 3.5 in Sql Server 2012

During installation of Sql Server 2012 on Windows server 2012 or addition of roles and features for SharePoint 2013, the setup wizard will...